I promised the boys, that I would make not-so-spooky wooden Halloween peg dolls, and suddenly I had a stroller full of compliant and happy boys.
It’s early August and I am shopping for craft supplies with a stroller full of impatient little boys, as it usually happens. I turn the corner of an aisle when my two passengers suddenly FREAK OUT. “NOOOOOOO Mama. Turn around NOW! This is TOO SCARY!”
I had been looking at paint colors and didn’t notice the Halloween display with skeletons, the Grim Reaper and all the usual characters that make Halloween so delightfully frightening. Our kids (and probably most kids their age) love dressing up in fun costumes, going trick or treating, and enjoying the cooler weather of early fall… but the spooky aspect of Halloween is often times just a bit too, well too spooky.
(This post is sponsored by Woodpeckers in return for my honest review of their products.)

I promised the boys that this year I would make some not-so-spooky Halloween decorations for our house, and suddenly I had a stroller full of compliant and happy boys. They were more than willing to help me find paint for our friendly Halloween wooden peg dolls.
Let me know what you think. Our kids approved of these cute and friendly Halloween wooden peg dolls. Last month we made some equally cute and friendly insect wooden peg dolls, you will be able to make all of these with one big bag of [easyazon_link identifier=”B00WQDTTCE” locale=”US” tag=”maminthenow0e-20″]wooden peg dolls[/easyazon_link] from Woodpeckers®.
Supplies Needed to Make Friendly Halloween Wooden Peg Dolls:
[easyazon_link identifier=”B00WQDTTCE” locale=”US” tag=”maminthenow0e-20″]Wooden peg dolls, assorted sizes[/easyazon_link]
[easyazon_image align=”none” height=”160″ identifier=”B00WQDTTCE” locale=”US” src=”http://mamainthenow.com/wp-content/uploads/2016/08/410q9uu6a4L.SL160.jpg” tag=”maminthenow0e-20″ width=”160″]
[easyazon_link identifier=”B00ATJSD8I” locale=”US” tag=”maminthenow0e-20″]Acrylic craft paint.[/easyazon_link] (I prefer “flat” paints for this project, not “shiny”)
[easyazon_image align=”none” height=”160″ identifier=”B00ATJSD8I” locale=”US” src=”http://mamainthenow.com/wp-content/uploads/2016/08/51NdO6juePL.SL160.jpg” tag=”maminthenow0e-20″ width=”105″]
[easyazon_link identifier=”B00V4EG6D6″ locale=”US” tag=”maminthenow0e-20″]Paint brushes[/easyazon_link]
[easyazon_image align=”none” height=”160″ identifier=”B00V4EG6D6″ locale=”US” src=”http://mamainthenow.com/wp-content/uploads/2016/08/51dMzVbTxyL.SL160.jpg” tag=”maminthenow0e-20″ width=”160″]
[easyazon_link identifier=”B000RAFUIU” locale=”US” tag=”maminthenow0e-20″]Tooth picks[/easyazon_link]
[easyazon_image align=”none” height=”144″ identifier=”B000RAFUIU” locale=”US” src=”http://mamainthenow.com/wp-content/uploads/2016/08/41vsY0EF5wL.SL160.jpg” tag=”maminthenow0e-20″ width=”160″]

Step-by-step instructions:
Check out my tutorial on how to make the insect wooden peg dolls for inspiration to make your peg dolls uniquely yours.

Face:
- Paint the face the desired skin color with a small flat brush.
- The face shape is a horizontal oval.
- For this project, I chose a light pink. I have also had great success mixing orange with white to get a slightly darker skin tone.
- I paint every peg doll I will be working on that day. This is especially important if you a mixing your own colors. In case you need to go back and fix a face, recreating the exact color is very hard.
- Use a toothpick to paint the eyes black, cheeks are a darker pink than the face and the mouth a red “heart shape.”
- When you paint with a toothpick, dip it in paint before every dot, to ensure that they are approximately the same size.

Pumpkin Peg Doll:
- Start by painting the face and facial features as described above.
- Paint the rest of the doll orange with a paint brush.
- With a toothpick, paint the leaves on top of the head.
- Make a couple of “squiggly” strands, like on a real pumpkin plant. (Sorry, I don’t know the technical pumpkin plant terminology.)

Ghost Peg Doll:
- Paint the entire peg doll white.
- Add the facial features with a toothpick: black eyes (one dot each), pink cheeks, black round/ oval mouth.
- I painted a small heart with a toothpick because it made him look friendlier – and… I love hearts.
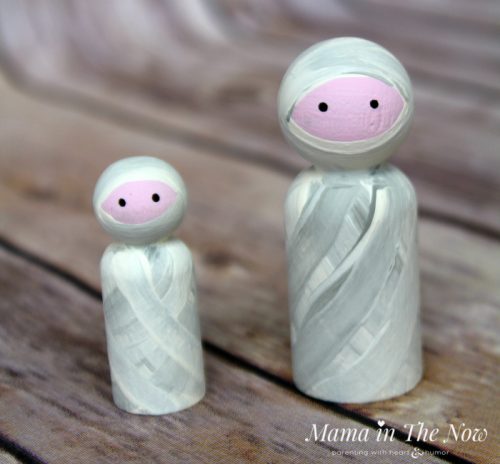
Mummy Peg Doll:
- Paint the face pink as described above, but make the shape a horizontal oval.
- Add black eyes with a toothpick.
- Put a few drops of gray acrylic craft paint in a bowl with white paint, mix the colors, but don’t blend them perfectly. You want to leave it “streaky” for the “wrapped effect.”
- Dip a flat paint brush in the gray/ white mix and paint the body diagonally in one direction, and then paint the entire body in the other direction.

Jack O’Lantern Peg Doll:
- Paint the entire peg doll orange.
- With a toothpick paint the triangle eyes and the classic jack o’lantern mouth. (You may want to practice this on a piece of paper… I know I had to!)
- I added a small red heart on the body to make him not-so-spooky. (Who doesn’t love a friendly pumpkin?!)

Skeleton Peg Doll:
- Paint the entire peg doll black.
- Add a red heart to the left of the center by using a toothpick.
- Paint the ribs on the body by using a toothpick.
- The “cranium”/ face is also painted using a toothpick. I added the black eyes and the teeth after the white face dried.
- The pink cheeks were added last with a toothpick.

Dracula Peg Doll:
- Paint the pink face as described above. Add all the facial features, including the two teeth.
- The size of his face is a bit larger and rounder than the other peg dolls.
- Paint the rest of the body black with a triangle going down in-between the eyes.
- With a toothpick, paint the front of his shirt with the butterfly and the buttons as the last additions.
Wood products from Woodpeckers®:
- I have been very impressed with the wood products I have bought from [easyazon_link identifier=”B00DNN5HOK” locale=”US” tag=”maminthenow0e-20″]Woodpeckers® through Amazon[/easyazon_link].
- Their products lend themselves perfectly to crafts and DIY projects.
- The wood shapes are uniform and without blemishes.
- Their customer service is wonderful with personal attention to each customer.
- They even send you an adorable ebook for inspiration when you purchase their peg dolls.
- Be sure to follow Woodpeckers for more craft inspiration: Twitter, Pinterest, Instagram, Facebook
Jansen helped me make these peg dolls and he was even my eager photography assistant when I had to take pictures for this post. It is now mid-August, and our house is already partially decorated for Halloween.
Both Jonah and Jansen love holding these peg dolls in their hands. They are a perfect fit for toddler and preschooler hands. Hopefully, the rest of our Halloween decorations will keep the theme of being not-so-spooky… and don’t worry – I have a few more friendly Halloween crafts to share here soon!
In the meantime, our Halloween spider wreath was a huge success last year – and with good reason, it was “not-so-spooky,” perhaps even downright CUTE and friendly! Don’t you think?

I have SO much fun crafting with products from Woodpeckers®. Check out these projects – they are sure to inspire you!

Wooden Heart Wall Decorations for Every Season

Wooden Peg Doll Gnomes & Christmas Elves


