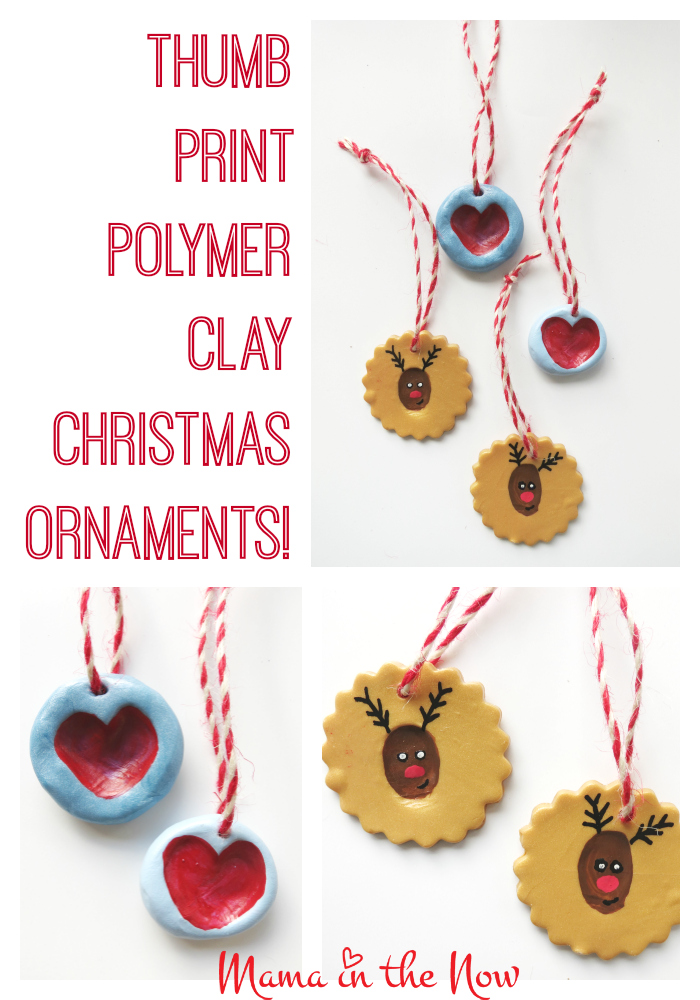
Nothing says “personalized gift” as a handprint or footprint from a child. (I guess it is still a personalized gift if it is an adult’s hand or foot print, although the cuteness factor isn’t quite there.) I LOVE how our thumb print polymer clay Christmas ornaments turned out. I know I will love hanging them on our tree for years to come. These ornaments are perfect gifts for grandparents, relatives and teachers – anyone who loves your cherub toddler as much as you do – or at least pretends that they do.

[bctt tweet=”DIY thumb print polymer clay #Christmas #Ornament craft! Fun for #kids of all ages. “]

Thumb Print Polymer Clay Reindeer Christmas Ornaments:
- Start with the cookie cutter polymer clay christmas ornament.
- Have your eager child place his thumb print in the middle of the ornament. I chose a round shape with scalloped edges, but any shape will work.
- Bake the ornament as instructed below and cool completely.
- BEFORE applying the glaze, paint the face of a reindeer with acrylic craft paint and [easyazon_link identifier=”B005QEZ9YW” locale=”US” tag=”maminthenow0e-20″]Sharpie Paint Pens[/easyazon_link].
- Brown face
- Antlers
- Red nose
- Black and white eyes
- After the paint has dried completely, add the [easyazon_link identifier=”B004HKSYKM” locale=”US” tag=”maminthenow0e-20″]glaze[/easyazon_link] for a beautiful shine and finishing touch.

Thumb Print Polymer Clay Heart Christmas Ornament:
- Start with a round ball-shaped polymer clay, a little larger than a quarter.
- Flatten it with your palm on a flat clean surface.
- Help your child place his thumb prints on the circle so they form a heart. The thumb prints will overlap a little at the bottom of the heart.
- Bake the ornament as instructed below and allow it to cool completely.
- I baked these ornaments separate from the cookie cutter shaped ones due to the difference in thickness.
- Paint the inside of the thumb prints with a thin layer of [easyazon_link identifier=”B00ATJSD8I” locale=”US” tag=”maminthenow0e-20″]acrylic craft paint[/easyazon_link], to preserve the fingerprint lines.
- After the paint has dried completely, finish according to the instructions.
Tips for making ornaments with polymer clay:
**Read this before you start!**
- Start with a small piece of clay and mold it in your hands. It takes a few minutes to warm up the clay so it is easier to work with. This is a perfect job for little helpful hands.
- Note! Some of the bright and colorful clay may temporarily stain your hands (and surfaces).
- Wash your hands when you start working with a new color.
- Protect your working surface with an old plastic place mat.
- Keep a package of baby wipes close. They are perfect for a quick clean up, before your messy toddler breaks free and sticks his little grubby fingers all over your otherwise spotless house!
- Hopefully this goes without saying, but an adult needs to handle the clay going in and coming out of the oven.
Supplies and tools used for all these ornaments:
[easyazon_link identifier=”B000I4OJ0A” locale=”US” tag=”maminthenow0e-20″]Cookie cutters[/easyazon_link]: I used an assortment of old cookie cutters my grandmother gave me. But these would be perfect for this project.
[easyazon_image align=”none” height=”160″ identifier=”B000I4OJ0A” locale=”US” src=”http://mamainthenow.com/wp-content/uploads/2015/12/61mZlf5IYGL.SL160.jpg” tag=”maminthenow0e-20″ width=”160″]
[easyazon_link identifier=”B0000CGB68″ locale=”US” tag=”maminthenow0e-20″]Polymer clay[/easyazon_link]: I really love the ones with a little shimmer.
[easyazon_image align=”none” height=”109″ identifier=”B0000CGB68″ locale=”US” src=”http://mamainthenow.com/wp-content/uploads/2015/12/41wcCpi5JjL.SL160.jpg” tag=”maminthenow0e-20″ width=”160″]
[easyazon_link identifier=”B004HKSYKM” locale=”US” tag=”maminthenow0e-20″]Polymer Clay Glaze[/easyazon_link]
[easyazon_image align=”none” height=”160″ identifier=”B004HKSYKM” locale=”US” src=”http://mamainthenow.com/wp-content/uploads/2015/12/41uxwhhKgqL.SL160.jpg” tag=”maminthenow0e-20″ width=”160″]
[easyazon_link identifier=”B000F9XBQQ” locale=”US” tag=”maminthenow0e-20″]Sharpie pen[/easyazon_link]
[easyazon_image align=”none” height=”160″ identifier=”B000F9XBQQ” locale=”US” src=”http://mamainthenow.com/wp-content/uploads/2015/12/51oTR3wZW4L.SL160.jpg” tag=”maminthenow0e-20″ width=”160″]
[easyazon_link identifier=”B005QEZ9YW” locale=”US” tag=”maminthenow0e-20″]Sharpie Paint Pen[/easyazon_link]
[easyazon_image align=”none” height=”160″ identifier=”B005QEZ9YW” locale=”US” src=”http://mamainthenow.com/wp-content/uploads/2015/12/51ijCJQ2BwZL.SL160.jpg” tag=”maminthenow0e-20″ width=”160″]
[easyazon_link identifier=”B00ATJSD8I” locale=”US” tag=”maminthenow0e-20″]Acrylic craft paint[/easyazon_link]
[easyazon_image align=”none” height=”160″ identifier=”B00ATJSD8I” locale=”US” src=”http://mamainthenow.com/wp-content/uploads/2015/12/51NdO6juePL.SL160.jpg” tag=”maminthenow0e-20″ width=”105″]
[easyazon_link identifier=”B004REMVWK” locale=”US” tag=”maminthenow0e-20″]Twine[/easyazon_link]
[easyazon_image align=”none” height=”160″ identifier=”B004REMVWK” locale=”US” src=”http://mamainthenow.com/wp-content/uploads/2015/12/51xgob8aVHL.SL160.jpg” tag=”maminthenow0e-20″ width=”160″]
[easyazon_link identifier=”B001ED3JMS” locale=”US” tag=”maminthenow0e-20″]Polymer Clay Tools[/easyazon_link]
[easyazon_image align=”none” height=”160″ identifier=”B001ED3JMS” locale=”US” src=”http://mamainthenow.com/wp-content/uploads/2015/12/51bAx6y0BOL.SL160.jpg” tag=”maminthenow0e-20″ width=”160″]
[easyazon_link identifier=”B000ARPJRM” locale=”US” tag=”maminthenow0e-20″]Rolling pin[/easyazon_link]
[easyazon_image align=”none” height=”160″ identifier=”B000ARPJRM” locale=”US” src=”http://mamainthenow.com/wp-content/uploads/2015/12/31tEK4coXML.SL160.jpg” tag=”maminthenow0e-20″ width=”160″]
Small straw, pencil or other pointy object (Hopefully there is no need for an image of this.)
Cookie sheet (I will spare you a picture of my old cookie sheets!)
Oven (I won’t add a picture here. I bet you can handle this item without my help!)
Baking & finishing instructions:
These apply to all the polymer clay ornaments!
- Preheat the oven to 275F.
- Place your creations on an oven-proof glass or metal surface. An old cookie sheet works perfectly.
- Bake for 15 minutes per 1/4” of thickness – MAYBE LESS – watch the oven like a hawk!
- I group my ornaments together by size and thickness, and bake the larger ones in a separate batch.
- Do NOT microwave
- Do NOT over-bake. The clay is NOT supposed to brown lightly on the edge like a pizza – take it from someone who has an entire cookie sheet of “Pinterest-fail” ornaments.
- Once the ornament has cooled completely, apply a layer of [easyazon_link identifier=”B004HKSYKM” locale=”US” tag=”maminthenow0e-20″]glaze[/easyazon_link] for that beautiful finished touch.
- Thread the [easyazon_link identifier=”B004REMVWK” locale=”US” tag=”maminthenow0e-20″]twine[/easyazon_link] through the hole, once the glaze has completely dried.
- Write the child’s name and year on the back of the glazed ornament with a [easyazon_link identifier=”B000F9XBQQ” locale=”US” tag=”maminthenow0e-20″]Sharpie permanent marker[/easyazon_link].
- Voila! Your ornament is now ready to spread cheer throughout the world.
Now, this was simple, easy and fun – wasn’t it?
Don’t miss the other awesome Christmas ornaments I have shared!
Kid-Friendly Polymer Clay Christmas Ornaments
Easy Kid-Friendly DIY Christmas Ornaments
![]()


CUTE! I have “go to the craft store to buy something to occupy the kids” on the agenda for Monday (yes, I am THAT person) and this is PERFECT!